How to use External References to link forms
This user guide explains how you can create forms and link them to each other using external sources. We will be creating new forms in this demonstration from scratch.
We assume that by now you have a generic idea of creating a new form. Let’s proceed with adding external data. It is important to note that external referencing only works with forms created using Go With Form.
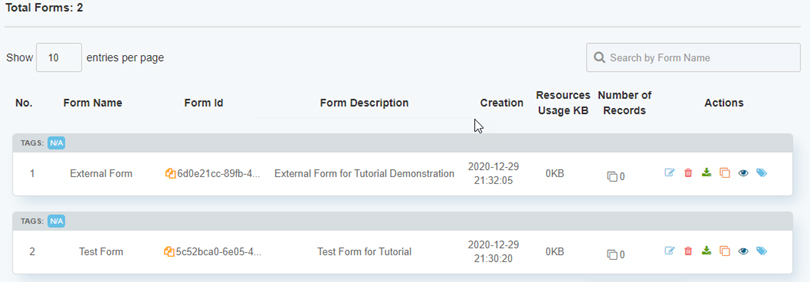
Here we have created 2 sample forms. One is named Test Form and the other one as External Form.
It doesn’t matter what name you give to these forms, as they are here only for illustration purposes. We will be referencing these forms back and forth with their names making it easy for you to follow this tutorial.
We will now open up the Test Form and add an external field.
To add an external field, either click once or drag and drop External Field to the Form and click the field to open up its settings in the Property tab.
Element ID#
The Element ID is the unique ID that you will assign to this element, which can also be used in the future for referencing this externally from other forms.
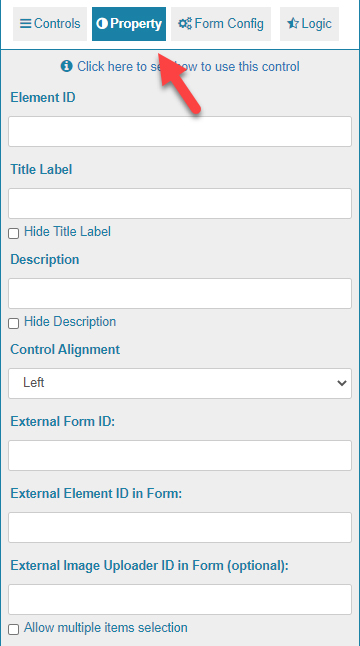
Title Label#
The Title Label specifies the Title for this field. You also have the option to hide this field if you check the Hide Title Label option.
Description#
Description comes right after the Title for the specific element.
Control Alignment#
Specify the alignment from Left, Center or Right.
External Form ID#
This is the corresponding external Form ID from where you want to import the data. But there is a condition for external references to work. When creating a new form, you have to check the “Allow references from external access.” You can find this ID for any form like this:
In the Form Dashboard, head over to the form you want to import, and click the duplicate icon. In our case, we will copy the ID for external form

This will copy the Form ID. Now go ahead and paste it in your form where you want this data to be displayed:
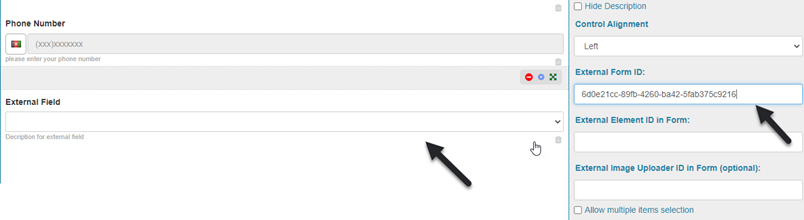
These steps are important to connect our test form with the external form so that the former can import data from the latter.
External Element ID in Form#
When you are importing data from external assets, it’s important to specify which Form it is. In our External Form ID example, we successfully demonstrated how this can be achieved.
But in order for the external form to show up in your current form, you also need to specify the External Element ID. and this external element ID needs to be from the same Form where you are importing data.
To insert External Element ID in your form, here is a step-by-step process:
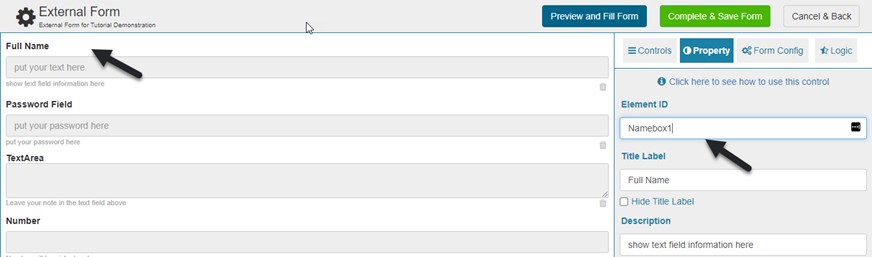
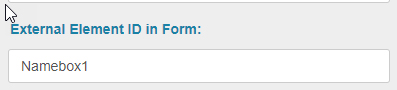
Open up the form from where you want to copy the element ID. Remember, you cannot have an external element ID and Form from different sources. The external element ID has to be from the same external Form you are importing. In our example, we will be importing data from External Form and the element. From our External Form, we shall be importing Full User Names. First, head over to the External Form and copy the Element ID:
Now paste this under the External Element ID in Form in your main form where you want the data to show up. In our case, this is our Test Form:
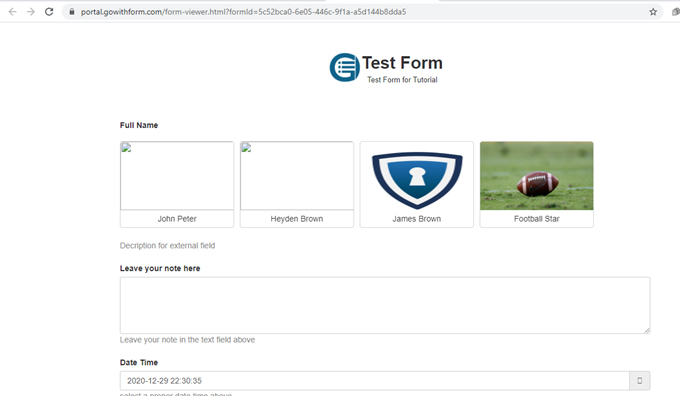
Once you Save and View Form, you will be able to see external data in a drop-down menu:
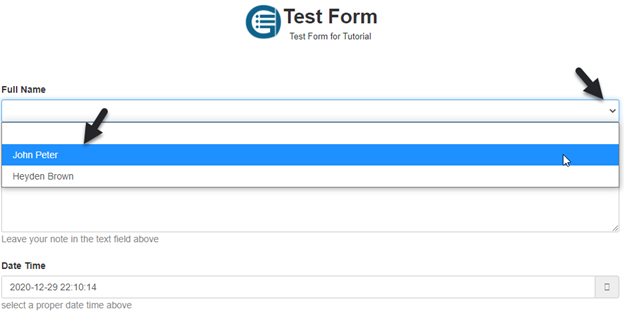
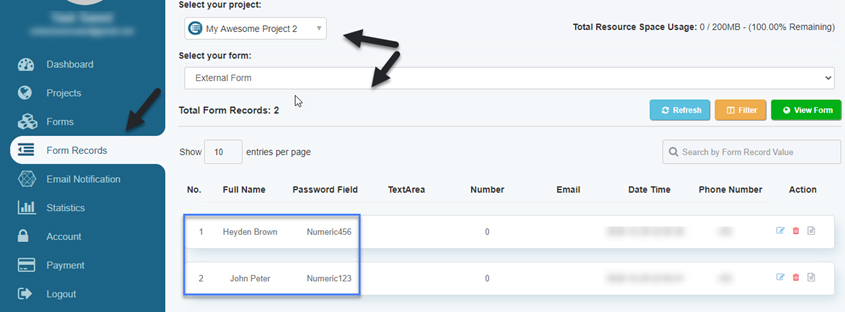
But how do you see the data? Open up Form Records, click on your project and the form, and you will see user data submitted.
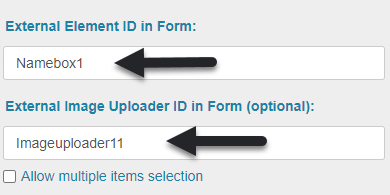
Similarly, if this external field remains connected from our main Test Form, we will be able to import more data once users keep submitting their entries in our External Form. You can also import an external image uploader in the form. There are going to be a few instances here to demonstrate how images can make a difference. Our External Form has an image uploader that we just added as follows:

Although optional, you can always add the image uploader in the External Image Uploader ID in Form (optional). This can be found at the bottom of the Property tab once you scroll down.
Now click Complete & Save Form, then Preview & Fill Form, then View Form. You will now see images uploaded by each user. The reason you DO NOT see images for the first 2 users, (John Peter and Heyden Brown) is because they did not upload their images while submitting their information. Since there exists no record about their images, you won’t see them here.
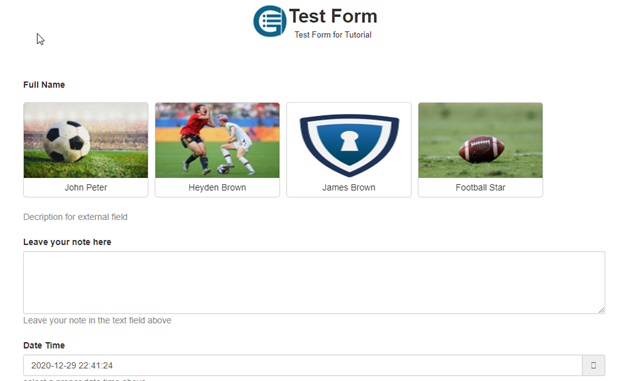
You always have the option to add images manually. Now that the elements are connected via external reference, simply go to the Form Records for the External Form and edit the records for both users.
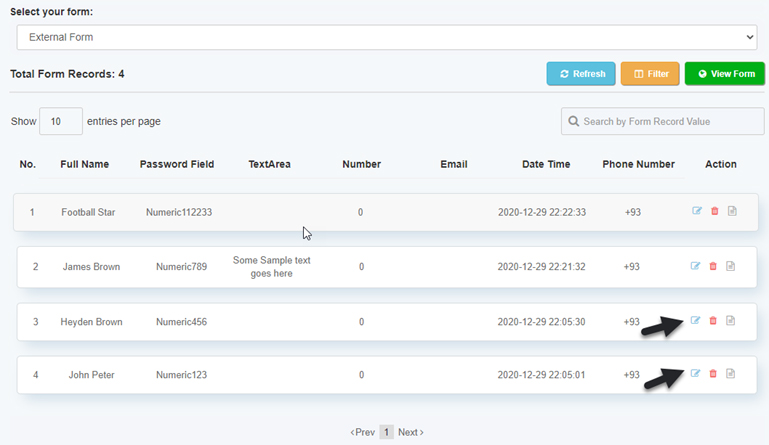
Upload their respective images, Update Records, come back to the Test Form, and reload for the changes to take effect.
Similarly, to remove user data, you can refer back to steps 7 to 8, and delete the records to reflect the changes immediately.
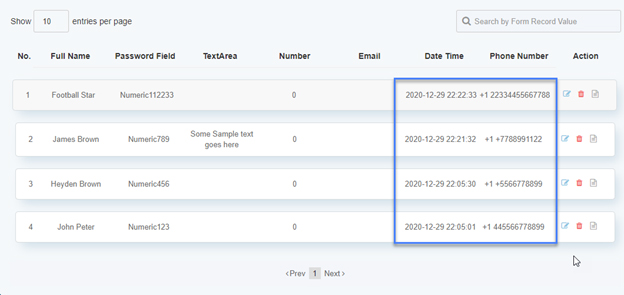
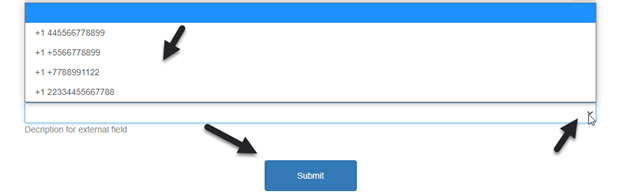
In another example, we will now be importing phone numbers and records from our External Form. We have gone ahead and updated the user records with their phone numbers as follows:
To import the phone numbers as external element, follow steps 1 to 3 in your Test Form. First, under Data Binding, click to add External Assets. Now head over to the External Form and copy/paste the External Element ID in Form
Once you Save and View Form, this is how the data for phone numbers will look like:
We’ve already covered Image Uploader. Let’s move on to File Uploader.
File Uploader#
File Uploader allows your users to upload a file while submitting their responses. This is quite helpful in case you not only need just their valuable feedback but also important documentation or files. Not all forms come with this unique feature.
How can you use this feature? Follow the steps below:
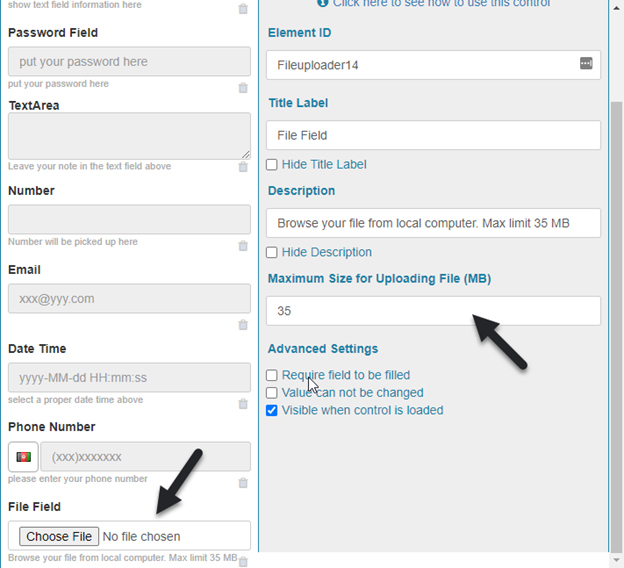
To use File Uploader, click the File Uploader icon in your Form and it will be automatically added up. On the right pane, you can adjust settings under Property. You can also define the file size limit, although it is a good idea to also mention it under Description as a friendly reminder to your users. The end result will look like this if you Save and View the form:
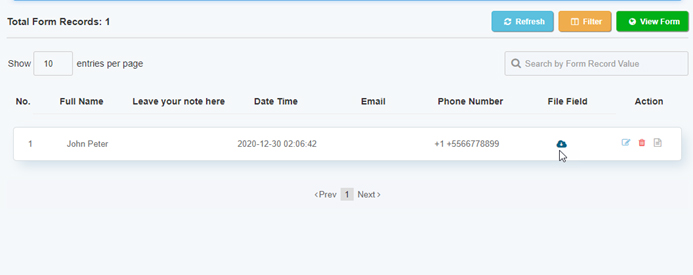
Once the user uploads file and submits the form, you can find it in User Records as follows:
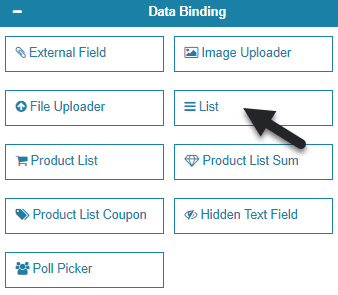
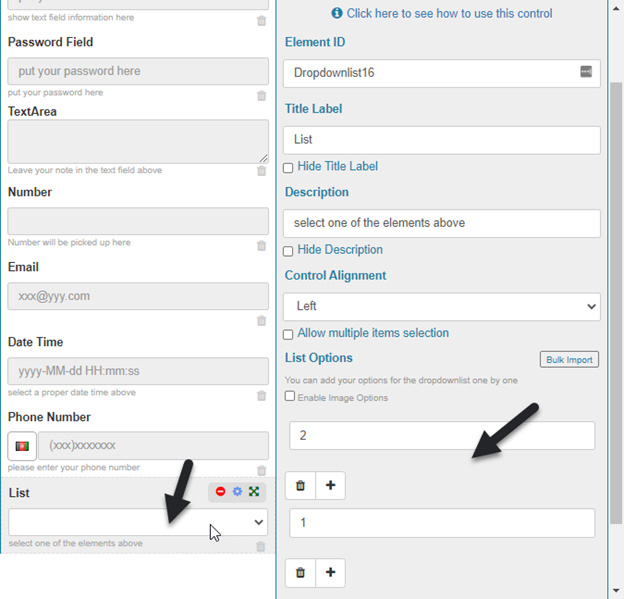
List#
List is a great way to add new items in the form of List in your form. To see how it works, head over to the Data Binding features and click List to add it in your form.
Once the List field is added, you can change its settings in the Property tab. Since it is going to be a drop-down menu of items, you need to add them manually. Under Property tab, scroll down and you will see List Options. You can add in as many items as you want by clicking the + icon.
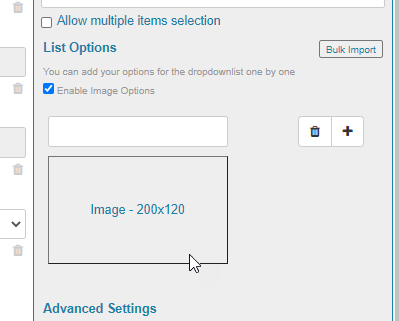
You can also enable images with each option. To do this check the Enable Image Options and you will see an Image uploader. Click to locate the file. Note that you will only be able to upload an image from an online link and not from your local hard drive.
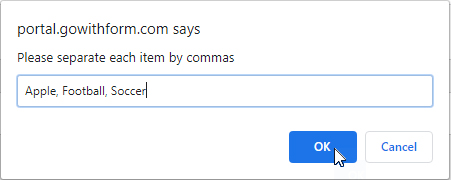
You can also use the Bulk Import function which allows you to import items into a list all at once. To use this feature, click on Bulk Import and you will see a popup dialog at the top. Add items you want to add, separated by the comma and click OK.
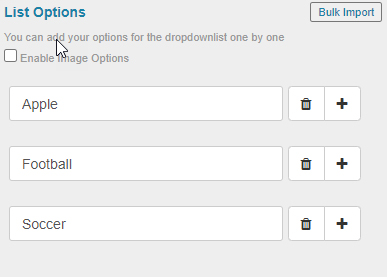
You will now see the list populated with the items.
Product List#
The Product List is an excellent feature of Go With Form that allows you to add any product with the ability to purchase and make a transaction right within the form. To add it, click Product List in Data Binding and you will see a new field.
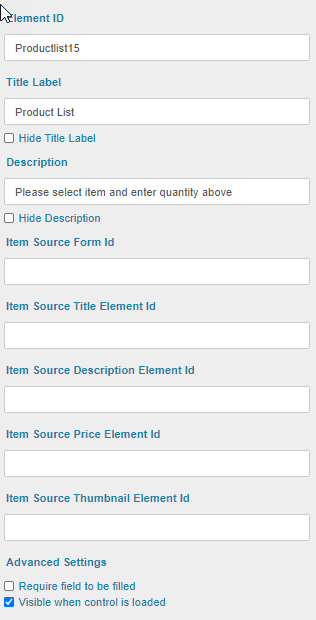
Remember that the Product List works like an external asset and you need to create another form to import your data from.
In our case, we will be using a new form that we have created to demonstrate this use-case scenario. It is titled Product List Form. We need to create all of the following for this to work:
- Form ID
- Element ID
- Description Element ID
- Price Element ID
- Thumbnail Element ID
Let’s create a Product list using the above elements in our Product List form and this is how the end result will look like:
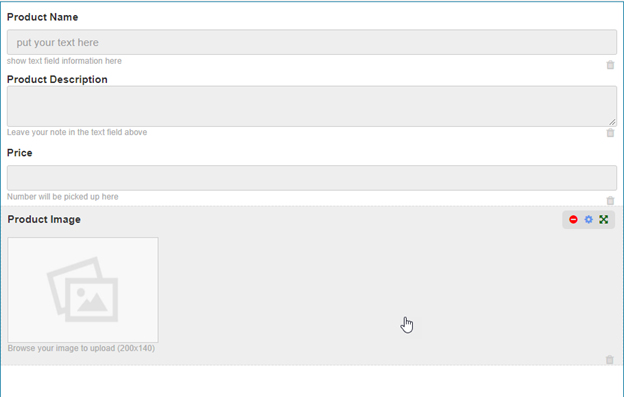
Here is the element ID for each one of the above elements:
- Product Name - Inputbox1
- Product Description - Richtextbox2
- Price - Numberbox4
- Product Image - Imageuploader5
We have simply added new fields from the Basics tab such as Input Box, Rich Text Box and Number Box and renamed them.
Before importing any data, it is important you share this form to your users so that they can submit product details. Or you can do it yourself.
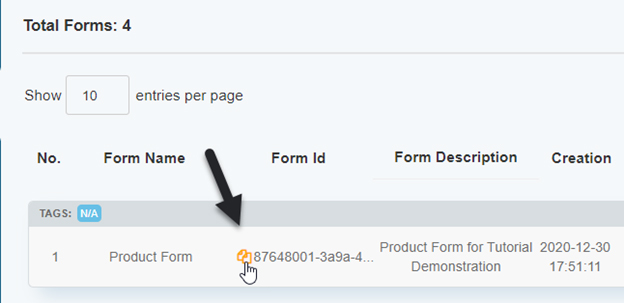
We will now head over to the User Dashboard and copy the Form ID for our Product Form.
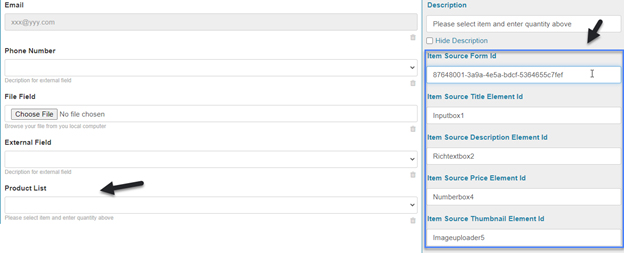
And paste it in the Product List in Test Form where we want the product list to be displayed. Alongside we are also pasting the element IDs for each element. This is important to display the data.
Once you Save and View the form, this is how the Test Form will show up:
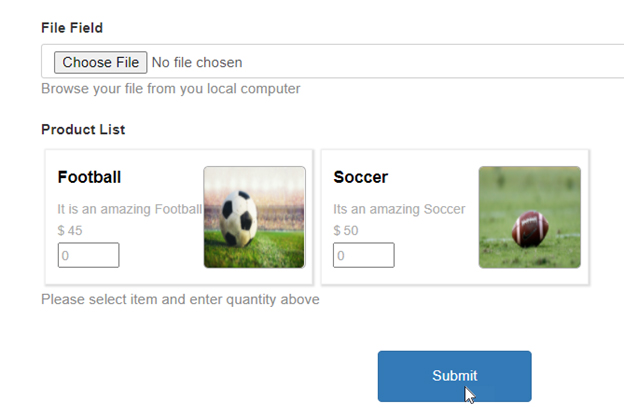
You will now see two products showing with their results. This is because we already have 2 form records for the Product Form which is showing the data from Source Form and Source Elements.
Product List Sum#
The product list sum is another vital feature of Go With Form that can be utilized for Product purchases in this user-case scenario. Whenever your user selects products, the Product List Sum showcases a total of amount and products for a final sum.
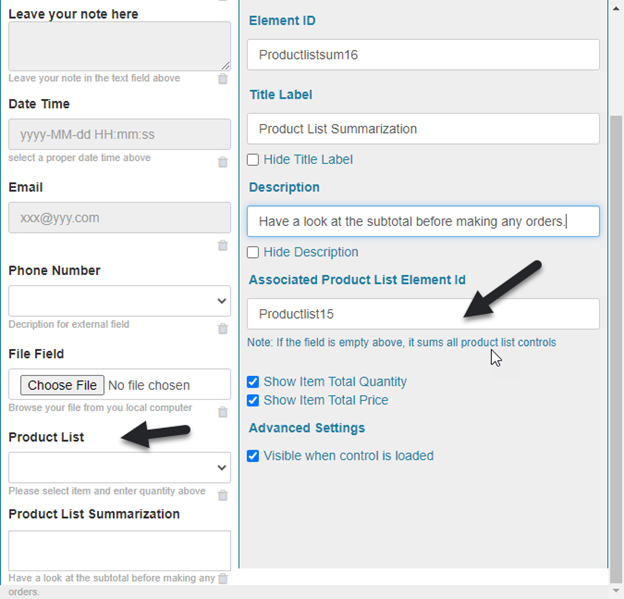
To demonstrate how this works, click to add the Product List Sum field in our Test Form. Under the Property tab, you need to add the Associated Product List Element ID, which will be the Element ID for Product List on the same form. In our case it is Productlist15.
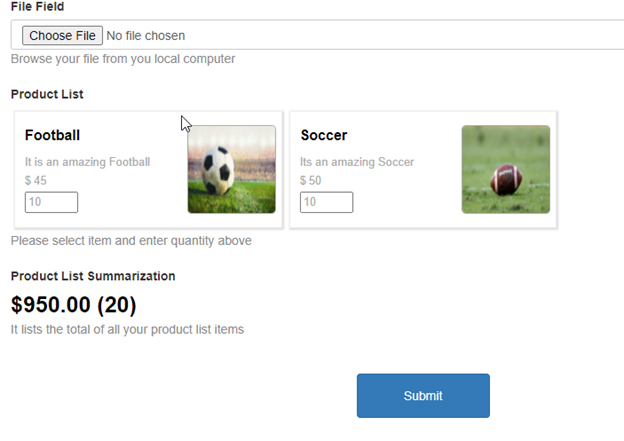
Save the form and hit View. You can now test to see the changes taking effect. Select any product and it’s quantity for the subtotal to change. In our case it’s 20 products for a total sum of $950.
Product List Coupon#
What’s the point in shopping if there are no coupons? After receiving feedback from our customers, we now have the Product coupon feature. This is important for an online user-case scenario where your users can buy after entering the coupon number of their favorite products right from within the form.
Important Note: Product Coupon feature is created the same way as Product list. You need to create a new form for coupons to be able to import data in your current form. It works the same way as external assets and the Coupon form needs to allow external referencing.
To use this feature, head over to the Data Binding tab and click to add Product List Coupon.
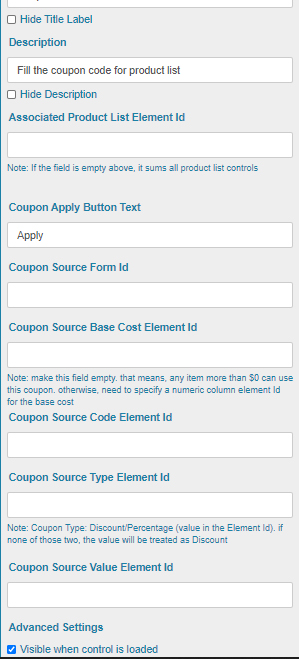
But since Product List Coupon works like an external asset, you need to create a new form to fill in the following fields in your current form for the Coupons to work:
a. Coupon Source Form ID - The external Form ID that you have used for coupons
b. Coupon Source Base Cost Element ID - The Sum of the value against which coupon will be issued
c. Coupon Source Code Element ID - The Element ID of the coupon code from source form
d. Coupon Source Type Element ID - Discount or Percentage? This is the ID from Source form that shows
e. Coupon Source Value Element ID - The final value of the coupon.
For Coupons to work, it is essential you create a separate form, just like in the case of Product List.
We have a Product List Coupon Form created with all of the essential Elements required in our main form.
The Coupon form works exactly the same way as a Product List form. Hence, it is important that you have all of the Element IDs copied for the above. These are:
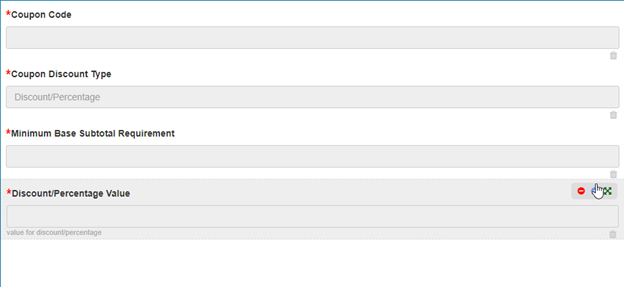
- Coupon Code - This is where the user will enter the coupon code. Please use the Text field
- Coupon Discount Type - Specify what type of a discount it is. Is it going to be a flat discount or a percentage of the product? Please use the Text field here.
- Minimum Base Subtotal Requirement - This specifies the minimum subtotal required to achieve the discount. This is the Number field.
- Discount/Percentage Value - Specify the value of discount. In case of percentage, the percentage value should be written as a decimal, such as 0.1, 0.2, and so on. Please also use the Number field here.
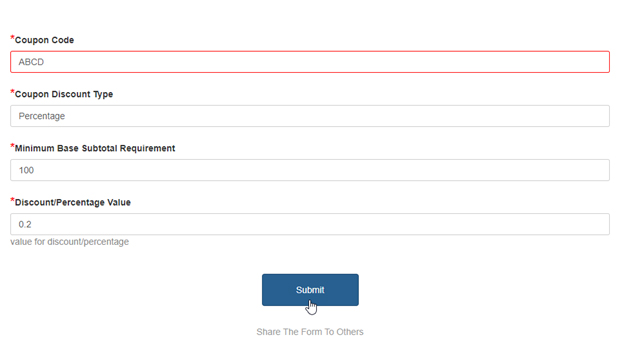
Here is how a simple coupon can look like when entering the field in the form view. In this case:
a. Our Coupon Code is ABCD
b. The Coupon Discount Type is a percentage discount.
c. The Minimum Base Subtotal Requirement is set at $100
d. The Discount/Percentage value is set at 0.2, which means that a discount of 20% applies to the subtotal if it exceeds $100.
Now that the user has submitted their record, we can import this data into our Main form.
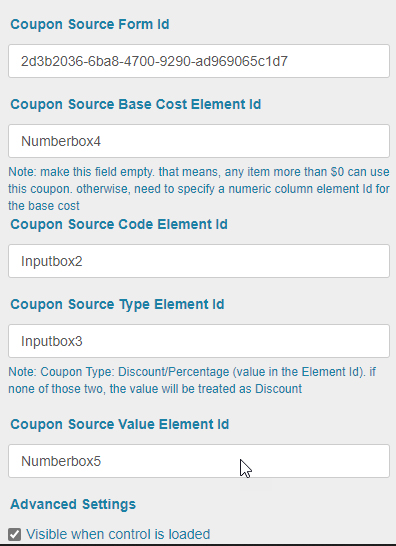
This is the same form where we will be importing data from our Coupon Form. Go back to your main form and click the Product List Coupon element.
Now you need to import all of the relevant and corresponding element IDs from your product form here. The Associated Product List Element ID also needs to be here, which in this case is Productlist15. The end result should look something like this:
a. The Coupon Source Base Cost Element ID should have the ID for the Minimum Base Subtotal Requirement
b. The Coupon Source Code Element ID should have the ID for the Coupon Code field
c. The Coupon Source Type Element ID should have the ID for the Coupon Discount Type field
d. The Coupon Source Value Element ID should have the ID for the Discount/Percentage Value field.
Once everything is set up, Save and View your form. Your users should now be able to enter a coupon and see the difference in pricing based upon the set perimeters:
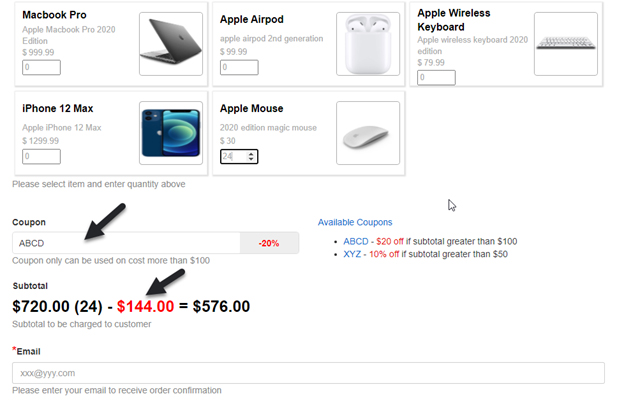
The ABCD coupon we created earlier has a 20% discount for a subtotal that is greater than $100 and we can see that as the subtotal increases, so does the discount.