How to configure Form Config Settings
Every form comes with configuration settings that allows you to add/delete and change rules. You can specify how the form should react whenever a user submits his/her data, what type of emails should they receive, the email copy and so on.
In our case we have created a Basic form for user registration and want to change its configuration settings.
To change config. Settings, click Form Config.
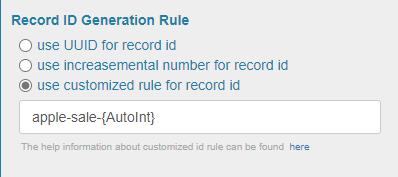
1. The first setting is Record ID Generation Rule. It specifies how do you want the user ID to be generated and has three options:
a. Use UUID for record ID – It means to use a unique user ID for records
b. Use incremental number for record id – Every time a new record is created, the unique ID will be incrementally increased.
c. Use customized rule for record ID - This means to manually specify customized rules for record ID

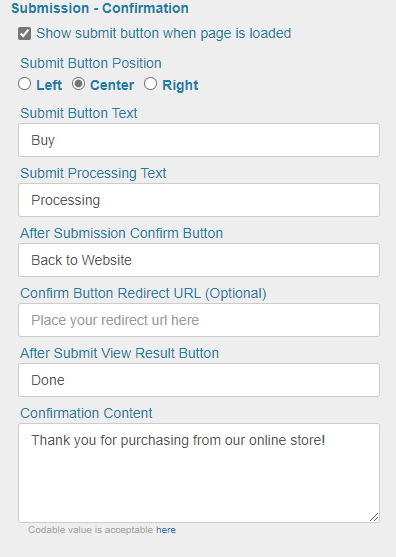
2. Submission Confirmation Settings. What should happen when a user submits his/her form? You can change all of these settings here.
a. Show submit button when page is loaded – Check if you want to show the Submit button after the page is loaded only.
b. Submit Button position – Define the position of the button, left, right or center.
c. Submit Button Text – What text should be mentioned? Depending upon your form, this could vary, such as Buy, Submit, etc.
d. Submit Processing Text – What message should the user receive when they have submitted their data?
e. After Submission Confirm button – What message do you want to show the user once the data is submitted?
f. Confirm Button Redirect URL (Optional) – Specify if you want the user to be redirected to a specific URL after submitting the form.
g. After Submit View Result Button – What text should be shown when results are loaded?
h. Confirmation Content – The content that the user sees as an affirmation of submitting their record.

How to Change Email Notification Rules and Settings?#
How do Email settings work? What content should the user see when they receive a confirmation email? Where the email should be sent? What rules apply for email? Who can receive the email? All this and more in Email Notification settings.
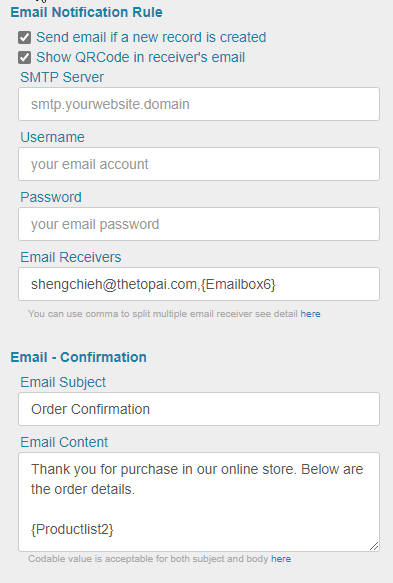
Under Email Notification Rule we can set the following:
a. Send email if a new record is created – Once a new record is generated (which is done when someone fills the form), an email will be generated. Check this option if you want to receive the email.
b. Show QRCode in receiver’s email – If you want the receiver to receive a QR Code in the email, then check this option.
c. SMTP Server – The SMTP server settings including the username and password go here should you decide to send the email from Form.
d. Email receivers – Specify who will receive the email? You can specify an email address by manually writing it. It is also a good rule of thumb for each user to receive their email once they’re registered. Separated by a comma, you can enter the codable value here. In our case the email address field is {Emailbox6}. Since this is the input box where users will enter their email address, you are instructing Go With Form to use determine this the receiver’s email address whenever the form submission takes place. This means once the user has submitted their details, they will receive an email.
Under Email Confirmation, you will find two options:
a. Email Subject – The subject of the email you want the receiver to receive.
b. Email content – What should be the content of the email message. Again, the codable values can work here. You can define the codable values to specify details. In our case, since it is a from where customers can choose and purchase their products, we have specified {ProductList2} as our codable value here. This means whatever the products that the user has bought, will be shown as a confirmation in the final message.

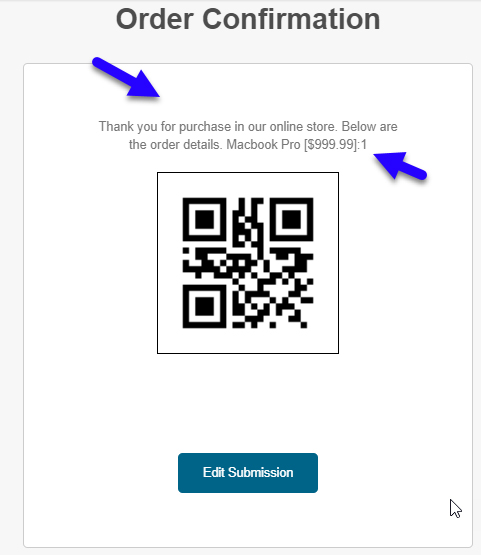
And here’s how a screenshot of the email that the user will receive based on the above settings and configurations. As you can see the codable values have successfully shown that the products the customer bought was a Macbook Pro valued at $999.
