How to use the QR Code Check-in feature
We heard your feedback. No other forms so far are offering this feature. A lot of our clients are from the hospitality sector and require QR Code Check-in feature as part of their user memberships.
The QR Code Check-in feature allows you to create a user registration form with the ability to utilize QR Codes in scanning and registering. Some scenarios where this form can be used is as following:
· New User Registration on the online store
· New User Registration and check-in for Gym/Health Club/Hospital
· Check-ins for hospitals/clubs/gyms
In short, wherever registrations and user memberships are required, you as the form creator can avail this brand new feature.
QR Code Check-in works using external references. Hence, whenever creating forms to use this feature, it is important you enable the Allow external references in this form option.
Let’s get started.
In order to create and use the QR Code feature, you need to develop two forms:
· One form will be used for user registration
· The other form for QR Code generation that will import data from the user registration form.
- First things first, we need to create the user registration form. Create a new Form and have all of the following fields for user registration which usually are required in any scenario:
a. Start Date/Time
b. End Date/Time
c. Maximum Registration Check ins
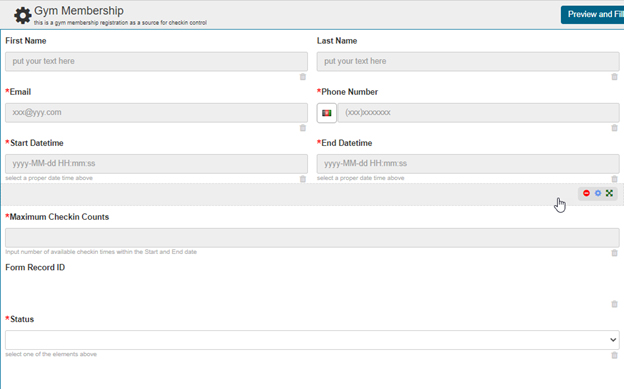
Here is how a typical user registration form in the case of a Gym Membership scenario may look like:
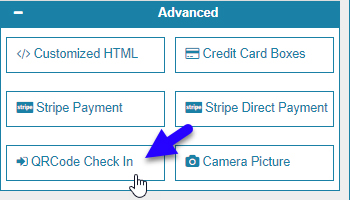
To add the QR Code feature, you now need to create a new form that your registered users will use for signing/checking in purposes. This form will then tele the data from the external user registration form. It works exactly the same like external elements. Make sure when creating this form, you enable the Allow external assets to work with this form selected. To add the QR Code, under the Advanced tab on your right, click on the QRCode Check in
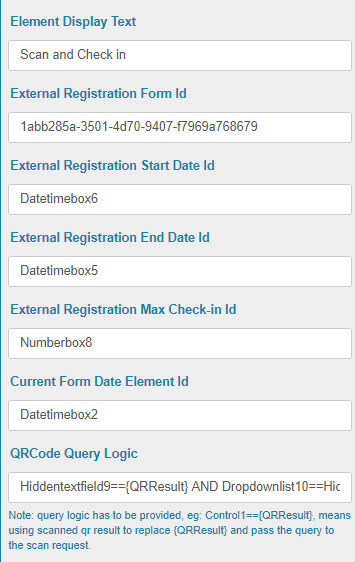
In the Property tab, scroll down and you will find the required current and external element IDs to fill. Here is what you need to fill in order for the QR Code checkin feature to work:
a. Element Display Text – What text should the QR Code feature display? We suggest you leave it to something along the lines of “Scan and Check-in”
b. External Registration Form ID – This is the Form ID for the user registration from you created in the first phase. Copy and paste the form ID here.
c. External Registration Start Date ID – This is the external Registration Start Date ID
d. External Registration End Date ID – The is the external Registration End Date ID
e. External Registration Max Check in ID – This is the external max registration check in ID from the user registration field.
f. Current Form Date Element ID – This is the Date Element ID from within your QR Check In form.
g. QRCode Query Logic – This is the logic with codable values that will go in this field and specify the values that the QR code should generated.
Here is how the filled-up Property tab looks like:
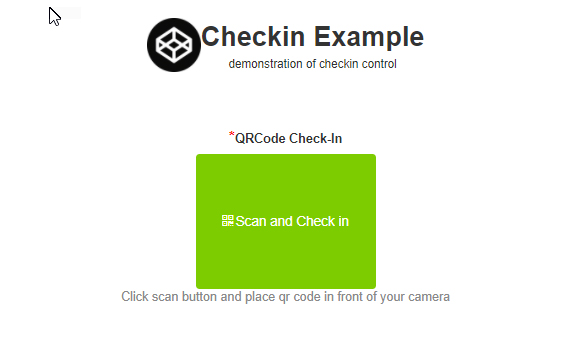
Once all of the details are filled, you can now see the form in action once you save and view:
Now that you have a good understanding of how QR Code works, it is also critical to understand how the QR Code Query Logic and Result Element Mapping works. If you take a look at the property tab for the QR Code features, you can see these two elements at the bottom:

Let’s understand how both of these work:
QR Code Query Logic is a mechanism used to validate the scanned QR Code.
Every time a QR Code is scanned, it represents a Form ID, which is unique only to that specific user. When a QR code is scanned, it will look for the form record ID which is stored in a field in every submission record.
For example:
hiddenfieldid9=={QRResult}
This logic is saying that the value in the external form's elementID "hiddenfieldid9" should equal to the QR Code QRResult (which is the form record ID).
{QRResult} is a predefined value returned by the qrcode scanner.
When we scan the qrcode, it should load and populate the check-in form with the membership data submitted in another form. And the only way we can get to that specific membership data is by identifying the form record id.
Another logic is:
Dropdownlist10==Hiddenfield10
This checks another condition. The dropdownlist10 is an element ID in external form which contains a value for each members. Therefore, this value needs to match the elementID in the current form's hiddenfield10's value. This Element ID is in the user registration external form as follows:
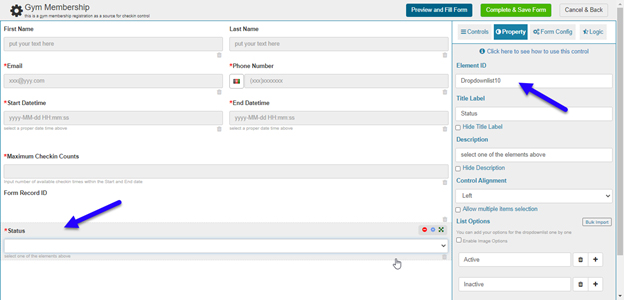
In the example we created, dropdownlist10 is a dropdown which contains Active and Inactive status for a member.
When this QR Code is scanned, it will load the specific member record which is Active or Inactive state because hiddenfield10 element has the value Active hardcoded.
Keep in mind, left side of the operator is coming from external form and right side is from current form. This means that the data from the external element ID will be loaded in the current form’s element ID that is on the right side of the operator.
The result element mapping is just a way of telling the form which elements to load the data from external form. When a QR Code is scanned, the data that we fetch from external form will load to the locations in the current form.
In our case:
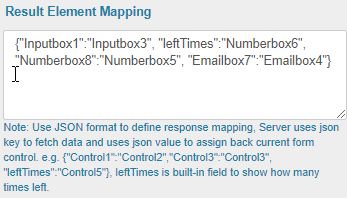
The above screenshot has the element IDs of all fields within the current form, which is the QR Check-in form. This means whenever the QR Code is checked, the current form will load all of the details as mentioned in the fields in Result Element Mapping.